Pixel Streaming Pipeline
Streams an Unreal Engine project to any device with a web browser, no powerful local hardware required on the viewer's end. Built as a custom Unreal 4.26 source build for the LiViCi We Won't Forget show in 2020.
What it is
A pipeline for streaming an Unreal Engine project to any device with a web browser, with no powerful local hardware needed on the viewer’s end — the server does all the rendering, the browser just handles input and displays the stream. Built as a custom Unreal Engine 4.26 source build with the Pixel Streaming plugin patches applied, plus a configured Node.js signalling server and Ngrok for public-internet exposure.
Built and shipped as Technical Artist at Lifelike & Believable in late 2020 to power the browser-based audience path on the LiViCi We Won’t Forget show. Used in production through 2021. The setup was involved enough that I wrote it up afterwards as a LinkedIn article and a YouTube tutorial so other Unreal users could replicate the same setup, plus a public GitHub gist of free STUN servers.
In short: a viewer on a phone, tablet, or weak laptop opens a URL and plays the same Unreal scene a powerful gaming PC is rendering — same input, same render, just streamed.
The problem
Unreal Engine projects need a powerful GPU to render. A viewer on a phone, tablet, or low-spec laptop can’t run them locally. For LiViCi We Won’t Forget, the show needed a remote audience path that worked on any device — viewers couldn’t be expected to have a VR headset or a gaming PC.
In late 2020, Pixel Streaming wasn’t shipped in the Unreal Engine editor. It existed as a plugin maintained inside Epic’s source tree but wasn’t bundled with public binary releases. Using it meant compiling Unreal from source with the plugin’s patches applied — and then standing up a Node.js signalling server, configuring STUN entries, and exposing the host to the public internet, none of which Epic’s docs walked through end-to-end. This pipeline put all of those pieces together into a repeatable workflow.
What it does
A browser sends inputs (clicks, key presses, touch joysticks on phones) to a packaged Unreal Engine executable running on a host PC. The Unreal process renders the scene and pipes frames back through the Pixel Streaming plugin to a Node.js signalling server, which negotiates a WebRTC connection to the browser. Ngrok tunnels the host’s port out to a public HTTPS URL with no static IP required — the free tier caps at ~40 concurrent users, enough for a curated audience like LiViCi’s.
How the pipeline runs (8 setup steps)
The setup runs in eight stages, from plugin activation through to a publicly-shareable URL. Each step’s how-to lives inside its collapsible below.
Step 1 — Enable the Pixel Streaming plugin in the Unreal project.
Step 1 in detail
Open the Unreal project. Edit > Plugins. Under the Graphics category, find the Pixel Streaming Plugin and check its enabled box. Click Yes to accept the beta-plugin warning, then Restart Now to reload the project with the plugin active.
Step 2 — Configure project settings — touch interface for phone/tablet input + launch parameters for audio and streaming ports.
Step 2 in detail
Project Settings → Engine → Input: check Always Show Touch Interface so the on-screen joysticks appear when the project’s accessed from a phone or tablet.
Editor Preferences → Level Editor → Play → Additional Launch Parameters: set the value to:
-AudioMixer -PixelStreamingIP=localhost -PixelStreamingPort=8888These params route audio through the AudioMixer (otherwise the stream is silent) and tell Pixel Streaming which host and port to bind to.
Step 3 — Install dependencies — Visual Studio Community 2019 (Game Dev with C++ workload + .NET Framework 4.8 SDK), Node.js.
Step 3 in detail
Visual Studio Community 2019: open the installer (Windows key → “Add or Remove Programs” → find Visual Studio → Modify). Under Workloads, enable Game development with C++. Under Individual components, find and enable the latest .NET Framework SDK (4.8 in 2020). Modify to install. Restart the PC when prompted.
Node.js: download the Windows installer from https://nodejs.org/en/download/ and run it. Default options are fine.
Step 4 — Package the project as a Windows 64-bit executable.
Step 4 in detail
File > Package Project > Windows > Windows (64-bit). Pick a destination folder. The package step compiles the project — depending on size and machine, this can take 30+ minutes.
Step 5 — Edit the executable’s shortcut target with launch parameters for audio + off-screen rendering.
Step 5 in detail
Open the packaged folder, find the .exe inside WindowsNoEditor, right-click → Create shortcut. Right-click the shortcut → Properties → Shortcut tab → Target. After the existing path, add:
-AudioMixer -PixelStreamingIP=localhost -PixelStreamingPort=8888 -RenderOfScreenNote the leading space before -AudioMixer — without it, the launch fails. The -RenderOfScreen flag lets the executable run in the background so the host PC can keep doing other work while serving streams.
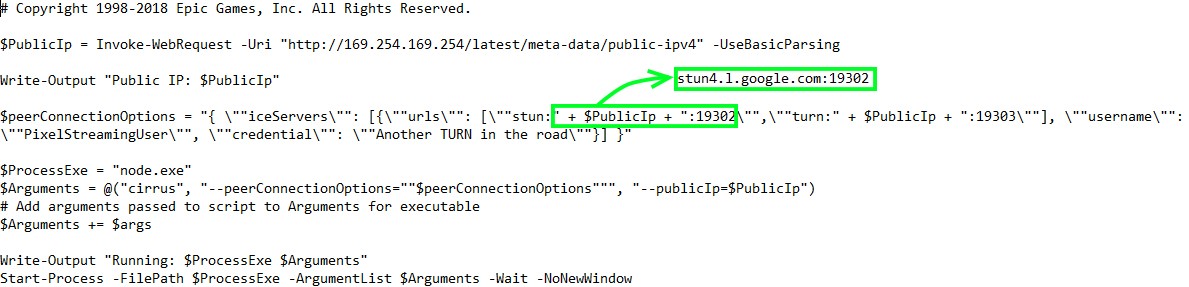
Step 6 — Configure the signalling server — copy the PixelStreaming folder out of the engine source, edit the STUN entry, paste in the local IPv4 address.
Step 6 in detail (STUN + Public IP edits with screenshots)
Go to the engine install folder: UE_4.26 > Engine > Source > Programs and copy the PixelStreaming folder. Paste it inside the packaged project’s WindowsNoEditor folder.
Open PixelStreaming > WebServers > SignalingWebServer. Make a backup copy of Start_AWS_WithTURN_SignallingServer (just in case). Open the original file in a text editor.
STUN edit. Replace the first + $PublicIp + :19302 reference with a free STUN server. Pick one from my GitHub gist — for example, stun4.l.google.com:19302.
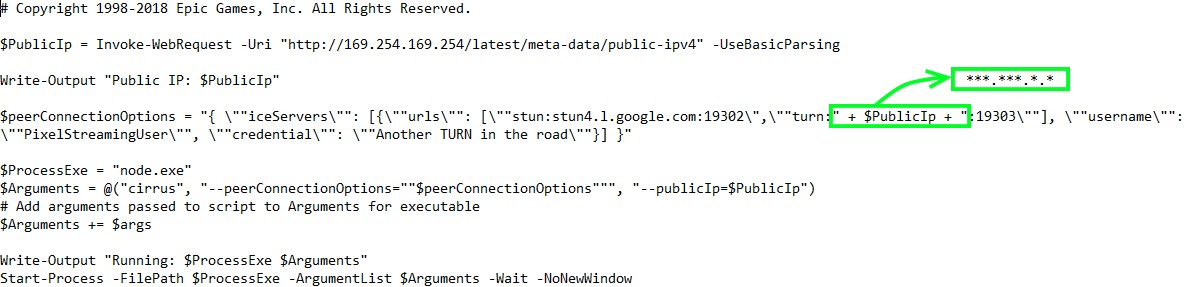
Public IP edit. Open cmd, type ipconfig, and copy the IPv4 Address value (something like 192.168.x.x on a LAN).
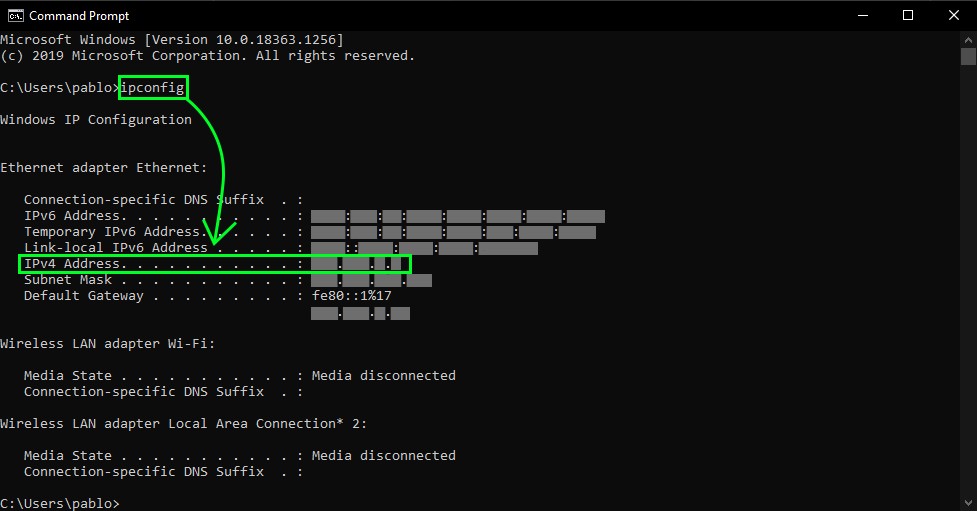
Back in the signalling server file, replace the second + $PublicIp + reference with that IP address.
Save the file as Start_AWS_WithTURN_SignallingServer.ps1. Run runAWS_WithTURN.bat to start the signalling server.
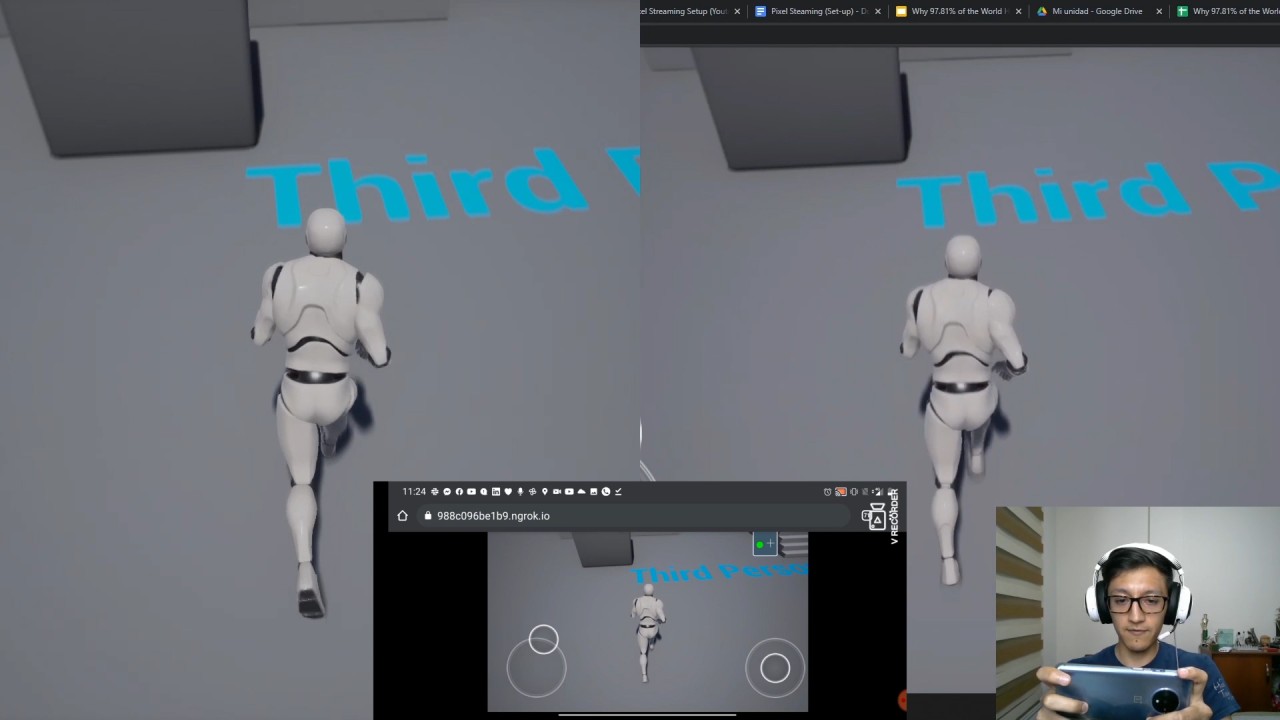
Step 7 — Test on the same network — launch the packaged exe, hit the host IP from a browser on any device sharing the LAN.
Step 7 in detail
Launch the packaged executable shortcut from Step 5. The signalling server from Step 6 should be running in the background. From any device on the same LAN — another PC, a phone, a tablet — open a browser and navigate to the host’s IPv4 address.

The scene should appear in the browser, interactive. One quality note: running the editor in-place looks pixelated in the stream, but the packaged executable renders cleanly.
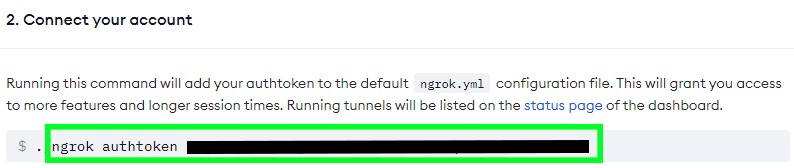
Step 8 — Expose to the public internet with Ngrok — authenticate once, run ngrok http 80, share the forwarding URL anywhere.
Step 8 in detail (Ngrok auth + tunnel)
Sign up at https://ngrok.com (I linked mine to GitHub). Download Ngrok for Windows, extract the executable, and place it next to the packaged project.
First-time auth. Open the Ngrok console. From your Ngrok dashboard, copy the ngrok authtoken <key> command and paste it into the console. This writes your auth credentials to the local Ngrok config.
Tunnel the port. Pixel Streaming uses port 80, so run:
ngrok http 80The console shows two Forwarding lines — an HTTP and an HTTPS URL pointing at *.ngrok.io. Share the HTTPS URL with anyone, anywhere. They open it in a browser and they’re inside your Unreal scene.
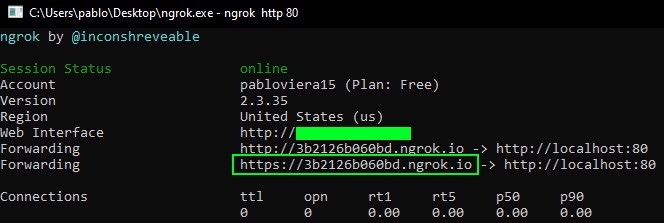
One gotcha: double-tapping Ctrl+C in the Ngrok console kills the tunnel instead of just copying. If that happens, just re-run ngrok http 80.
How it was used in production
This pipeline powered the browser-based audience path for LiViCi We Won’t Forget (2020 premiere → 2021 ongoing). A viewer with no VR headset and no gaming PC could open a link, see the live circus performance rendered on AWS, and interact in the same multiplayer audience as the VR users and the local-PC users.
The free Ngrok tier’s ~40 concurrent user ceiling was the audience size cap. For LiViCi’s invite-only curated audiences, that was the right ceiling. Scaling further would require a static IP and a paid hosting tier (AWS, GCP, or similar), which the show didn’t need for its scale.
Where it didn’t fit — Virtual Camera attempt
I tried adapting this pipeline for the Versatile Media Virtual Camera workflow — Pixel Streaming the live Unreal viewport to the iPad rig. The pipeline worked, but the latency was too high for fine cinematographic control: framing a shot needs sub-frame motion response, and the WebRTC round-trip plus encode/decode added enough delay that subtle framing felt rubbery. The VCam rig ended up using a dedicated low-latency video transmitter instead. Pixel Streaming is great for audience-facing experiences; not for operator-facing ones where input timing is on the critical path.
What it became — the tutorial
The setup was involved enough — eight steps across two software toolchains, plus a custom signalling-server edit and a Node.js dependency — that I wrote it up afterwards so the next Unreal user trying this in 4.26 wouldn’t have to piece it together themselves:
- LinkedIn article — full step-by-step text walkthrough with screenshots, published December 2020.
- YouTube tutorial — same setup as a video walkthrough, also December 2020.
- GitHub gist of free STUN servers — drop-in list so other users can configure their signalling server without hunting for a STUN provider.
In retrospect
Unreal Engine 4.27 (mid-2021) shipped Pixel Streaming as a stock plugin bundled with the editor, and Unreal 5.x matured it further. The custom 4.26 source-build approach this pipeline documents is now historical — anyone setting up Pixel Streaming today can skip Steps 3–5 entirely and just enable the bundled plugin. This page is a snapshot of what was needed before Epic built it in.