Photogrammetry Pipeline
A photo-to-asset pipeline taking real-world scans of objects, environments, and human heads through to production-ready Unreal Engine assets.
What it is
A photo-to-asset pipeline that takes real-world scans of objects, environments, and human heads through to production-ready Unreal Engine assets. Photogrammetry is the technique of capturing many overlapping photographs of a real subject, then reconstructing the 3D shape from those photos in software and cleaning the result up into something a real-time renderer can actually use. The pipeline runs in two flavours: a five-tool chain for objects and environments (Reality Capture → Maya → Marmoset Toolbag → Substance Painter → Unreal Engine), and a six-tool variant for human heads that swaps Maya for Wrap 3D and adds MetaHuman Creator before Unreal for full character rigging.
Built and refined across XRTales, Lifelike & Believable Animation Design, Reblika, and Versatile Media since 2018 as Technical Artist and now Realtime Supervisor. Both flavours have held as the most reliable way to take a real subject from raw photos to a production-ready Unreal asset across seven years of use.
The problem
Modeling complex real-world objects (a tree trunk, a stone monument, a human face) by hand in 3D software is time-consuming and rarely matches the real reference. Asset libraries like Quixel Megascans (Epic’s library of pre-scanned real-world assets) cover a lot of ground but never every project’s specific needs.
Photogrammetry solves the capture side, but the raw output isn’t directly usable: too many polygons, baked-in capture-time lighting, and topology that doesn’t animate cleanly. The pipeline I built bridges that gap, taking the raw scan through to a clean, low-poly, well-textured asset that drops into Unreal.
What it does
Objects & Environments
The five-tool chain for non-character subjects (props, environment pieces, monuments, location-specific assets):
- Reality Capture — photos → high-poly mesh + texture
- Maya — retopology (rebuilds the mesh as a clean, low-poly, animation-ready version)
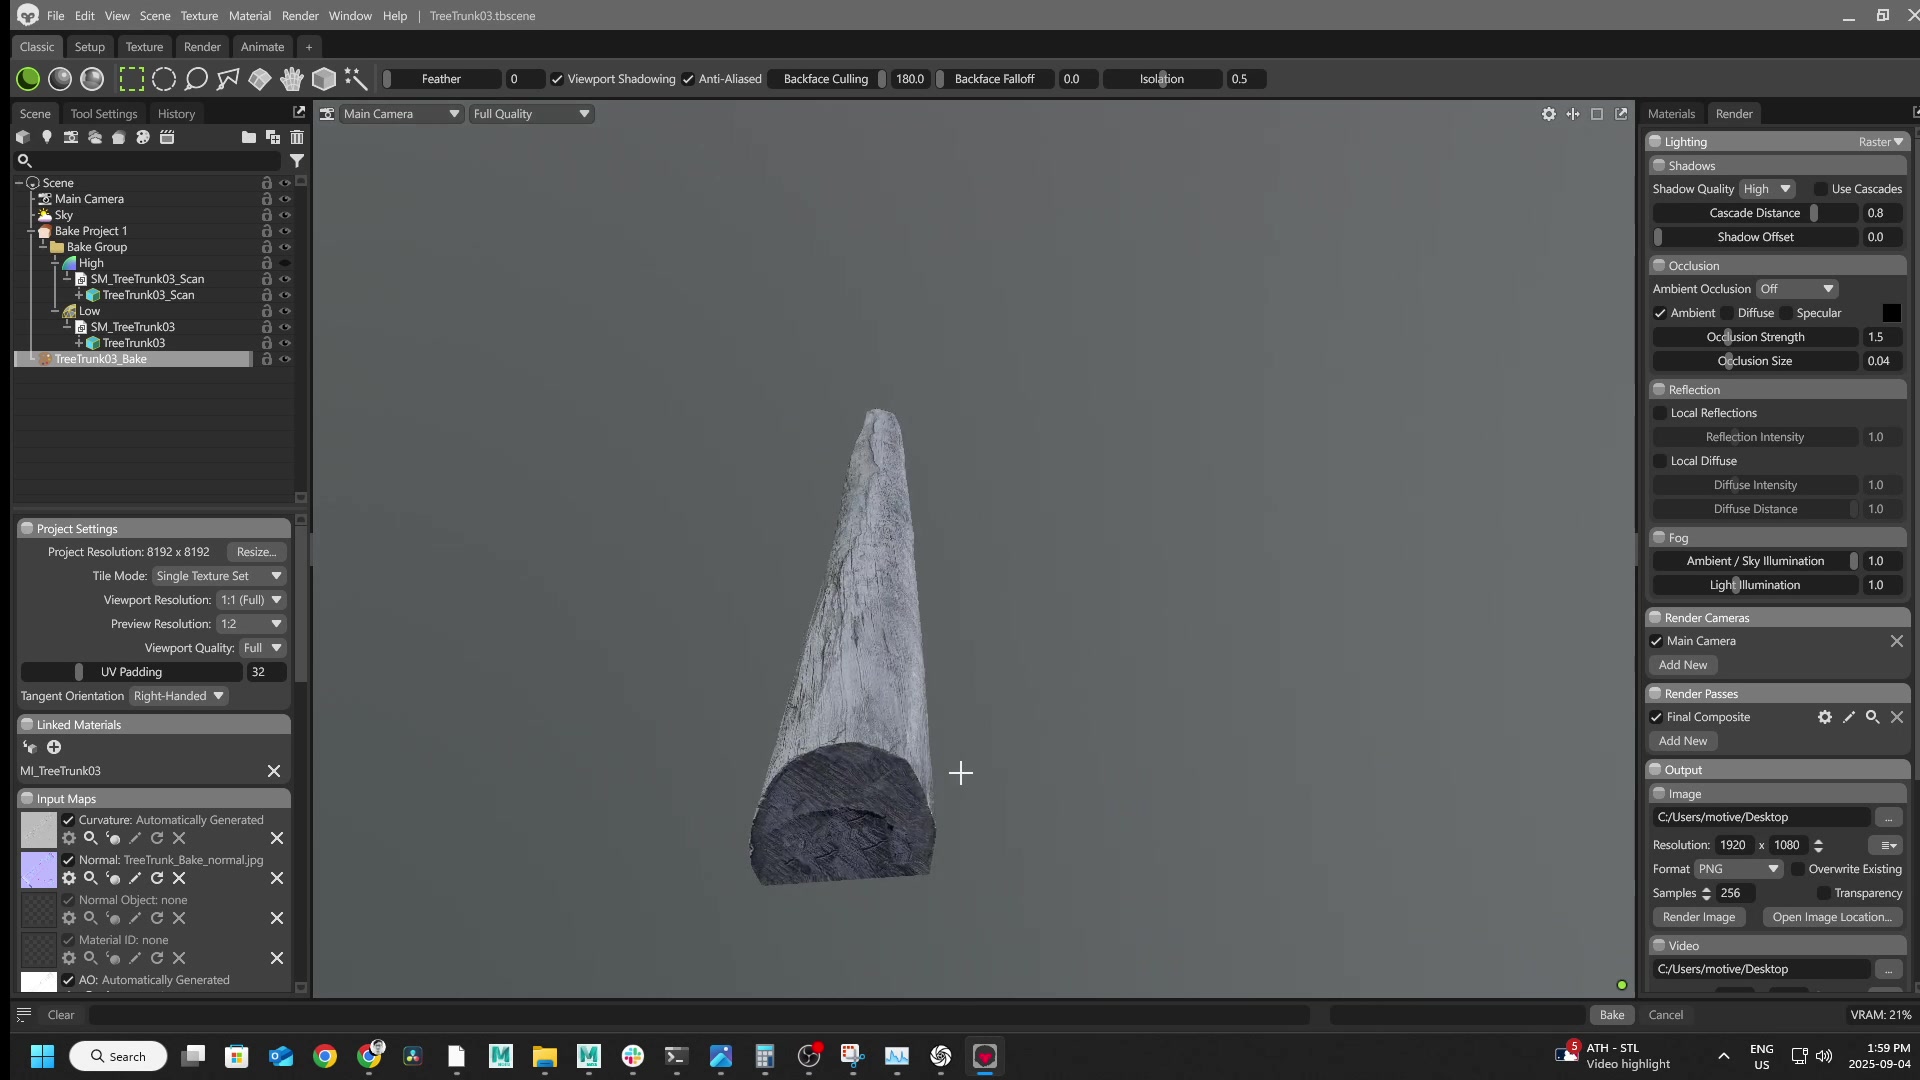
- Marmoset Toolbag — bakes high-poly detail onto the low-poly (normal, AO, curvature maps at 8K)
- Substance Painter — texture cleanup, removes lighting bake-ins
- Unreal Engine — final material set, production-ready
The 5-step object pipeline in detail
-
Reality Capture. Photos go in, a high-resolution 3D mesh and texture come out, reconstructed from the photo set.
-
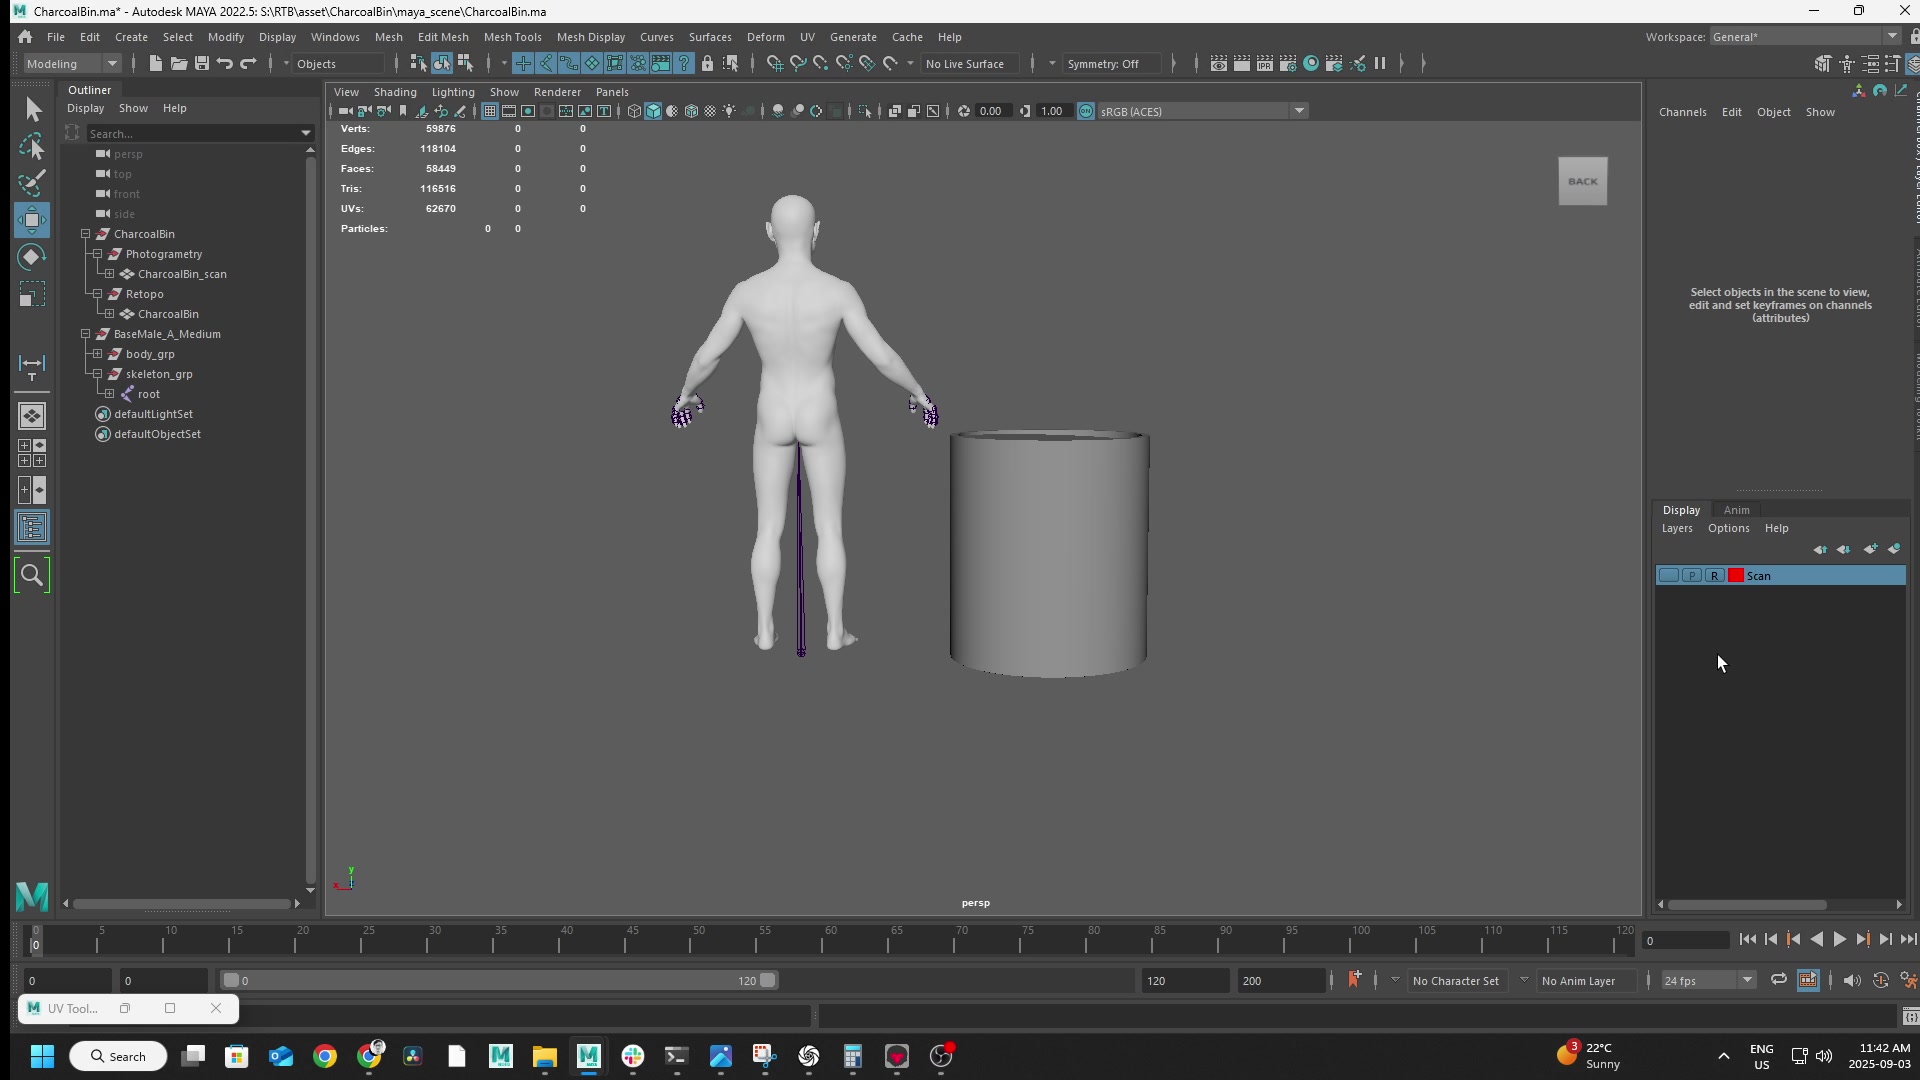
Maya. I rebuild a clean, low-polygon version of the mesh by hand (a step called “retopology”), so the asset animates and renders efficiently in real time.
-
Marmoset Toolbag. Bakes the high-poly mesh’s surface detail onto the low-poly version, preserving the visual fidelity at a fraction of the polygon count. The bake produces normal maps (textures that encode surface bumps and detail so the low-poly geometry reflects light as if it still had the high-poly’s micro-detail), ambient occlusion (the soft shadows in concave areas and crevices), and curvature maps (edge and indentation highlights used during texturing). All maps export at 8K resolution for production assets.
-
Substance Painter. Patches any texture imperfections from the photogrammetry source (lighting bake-ins, seams, missing coverage) and refines the final material.
-
Unreal Engine. The asset’s final destination, integrated as a production-ready material set.
Heads & Characters
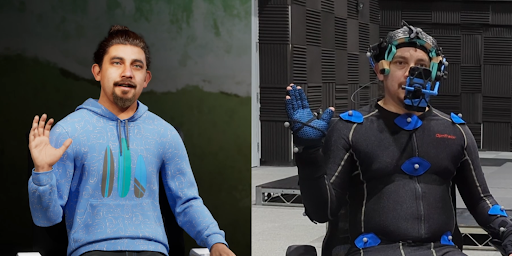
The variant for human head scans. Capture, reconstruction, baking, and texture cleanup work the same as the object pipeline. Two differences: Wrap 3D replaces Maya for retopology (purpose-built for head topology — conforms a known clean head mesh onto the scan), and MetaHuman Creator comes before Unreal to wrap a full MetaHuman rig around the photogrammetry head (facial blendshapes, body rig, performance-capture-ready).
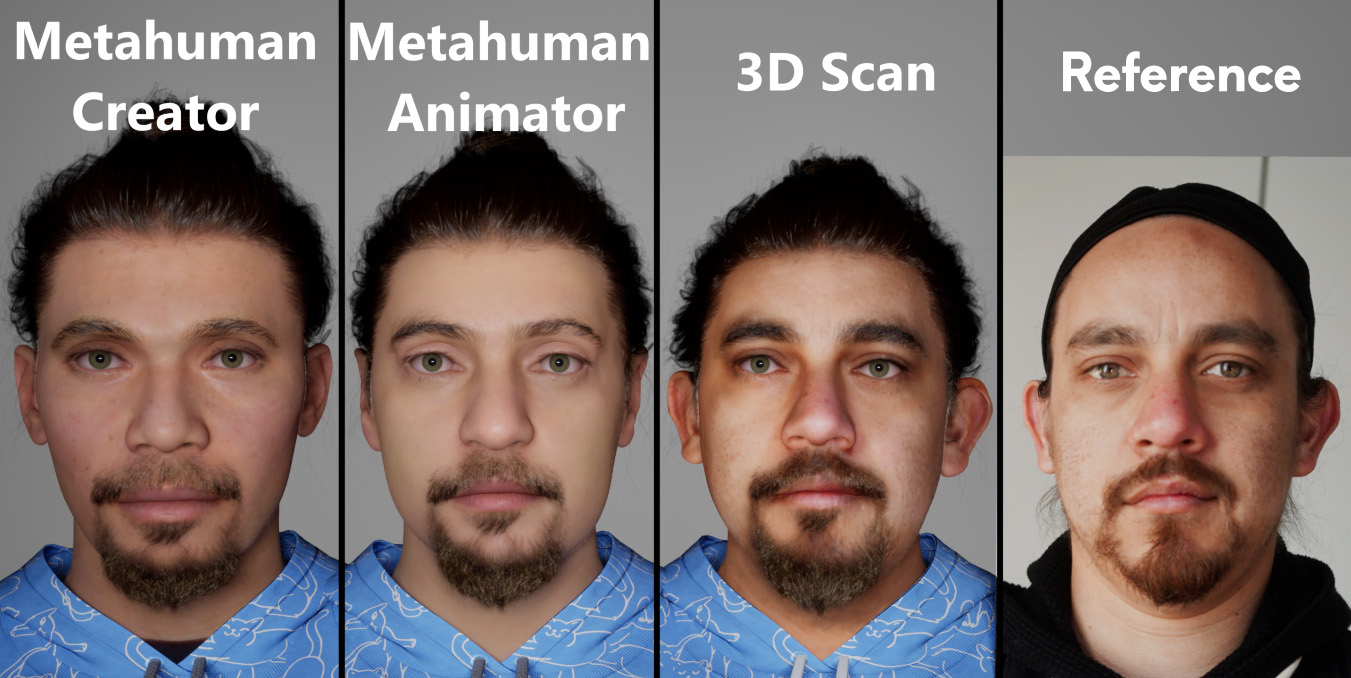
There are three ways to turn a real person into a digital character, trading time for fidelity: MetaHuman Creator preset-blending (5–10 min, rough likeness), MetaHuman Animator iPhone capture (30–60 min, facial proportions from TrueDepth), and the full photogrammetry pipeline (3–4 hours, pore-level skin detail and asymmetries).
How the MetaHuman Creator preset-blending workflow works (step by step)
MetaHuman Creator is Epic’s cloud app for designing MetaHuman characters from a library of preset faces. The preset-blending workflow:
- Open MetaHuman Creator from the Unreal Engine launcher (or the web version).
- Pick a base preset. Epic ships dozens of pre-made MetaHumans across age, ethnicity, and body type. Pick the one closest to the reference as a starting point.
- Blend toward the target. Drag any region of the face (eyes, nose, jawline, mouth, ears) toward other presets to combine features. The app can blend up to three different presets at once per region.
- Adjust sliders for features that don’t blend well. Direct controls for nose width, eye separation, lip thickness, brow ridge, and similar parameters.
- Customise hair, eyebrows, eyelashes, and facial hair from Epic’s groomed presets. Pick a body type. Pick clothes.
- Sync to Unreal. Export through Quixel Bridge into the target Unreal Engine project.
Best for: quick character prototyping, or when the goal is “a person who looks plausible” rather than “this specific person.” Quality ceiling is the preset library — you can only blend toward faces that already exist in Epic’s set, so you’ll never capture a feature that’s unique to the real subject.
How the MetaHuman Animator iPhone capture workflow works (step by step)
MetaHuman Animator extends MetaHuman Creator with an iPhone-based capture pipeline. It uses the iPhone’s TrueDepth depth sensor to record real face geometry, then aligns a MetaHuman template to that scan.
- iPhone setup. Any iPhone with TrueDepth (X or newer, the ones with a Face ID notch). Install Epic’s free Live Link Face app.
- Capture the subject. The subject sits still while the iPhone records a short video. The Live Link Face app captures synchronised RGB and depth-sensor data the whole time.
- Import into Unreal. Transfer the captured session into Unreal’s MetaHuman Animator project.
- Draw alignment curves. Manually trace the eyes, eyelids, ears, and mouth on a representative frame so the system knows where those features sit on the captured face. This is the manual step — every capture needs its own curves drawn.
- Generate the MetaHuman. The system uses the alignment curves to fit a MetaHuman base mesh to the iPhone-captured geometry, producing a MetaHuman that resembles the captured person more closely than preset-blending alone.
- Refine in MetaHuman Creator if needed: adjust hair, skin tone, eye colour, etc.
Best for: when the iPhone is the only capture tool available, or when you need better-than-Creator accuracy without the photogrammetry investment. Quality ceiling is the iPhone TrueDepth resolution — better than preset blending because it captures real geometry, but limited compared to a multi-camera photogrammetry scan.
The full 6-step head photogrammetry pipeline (Reality Capture → Wrap 3D → Marmoset → Substance → MetaHuman Creator → Unreal)
The steps below walk through what the full photogrammetry approach does:
- Reality Capture. Same reconstruction step as the object pipeline.
- Wrap 3D. Replaces Maya for retopology. Wrap 3D is purpose-built for head topology: it conforms a known clean head mesh onto the scanned surface, which means consistent edge flow across every performer scanned and topology that’s animation-ready out of the gate.
- Marmoset Toolbag. Same high-to-low detail bake as the object pipeline.
- Substance Painter. Same texture-cleanup pass as the object pipeline.
- MetaHuman Creator. The same Epic app used in the preset-blending approach above, but here used differently: it takes the retopologised, textured photogrammetry head and wraps a full MetaHuman rig around it. That includes facial blendshapes (the mesh deformations that drive expressions like smiling, blinking, or frowning), a body rig (the skeleton and joint controls that drive body animation), and the standard MetaHuman skeletal hooks for performance capture.
- Unreal Engine. The character drops into Unreal as a production-ready MetaHuman, animation- and performance-capture-ready.
How it’s used
The pipeline has scanned a wide range of subjects across multiple productions, split between the two flavours:
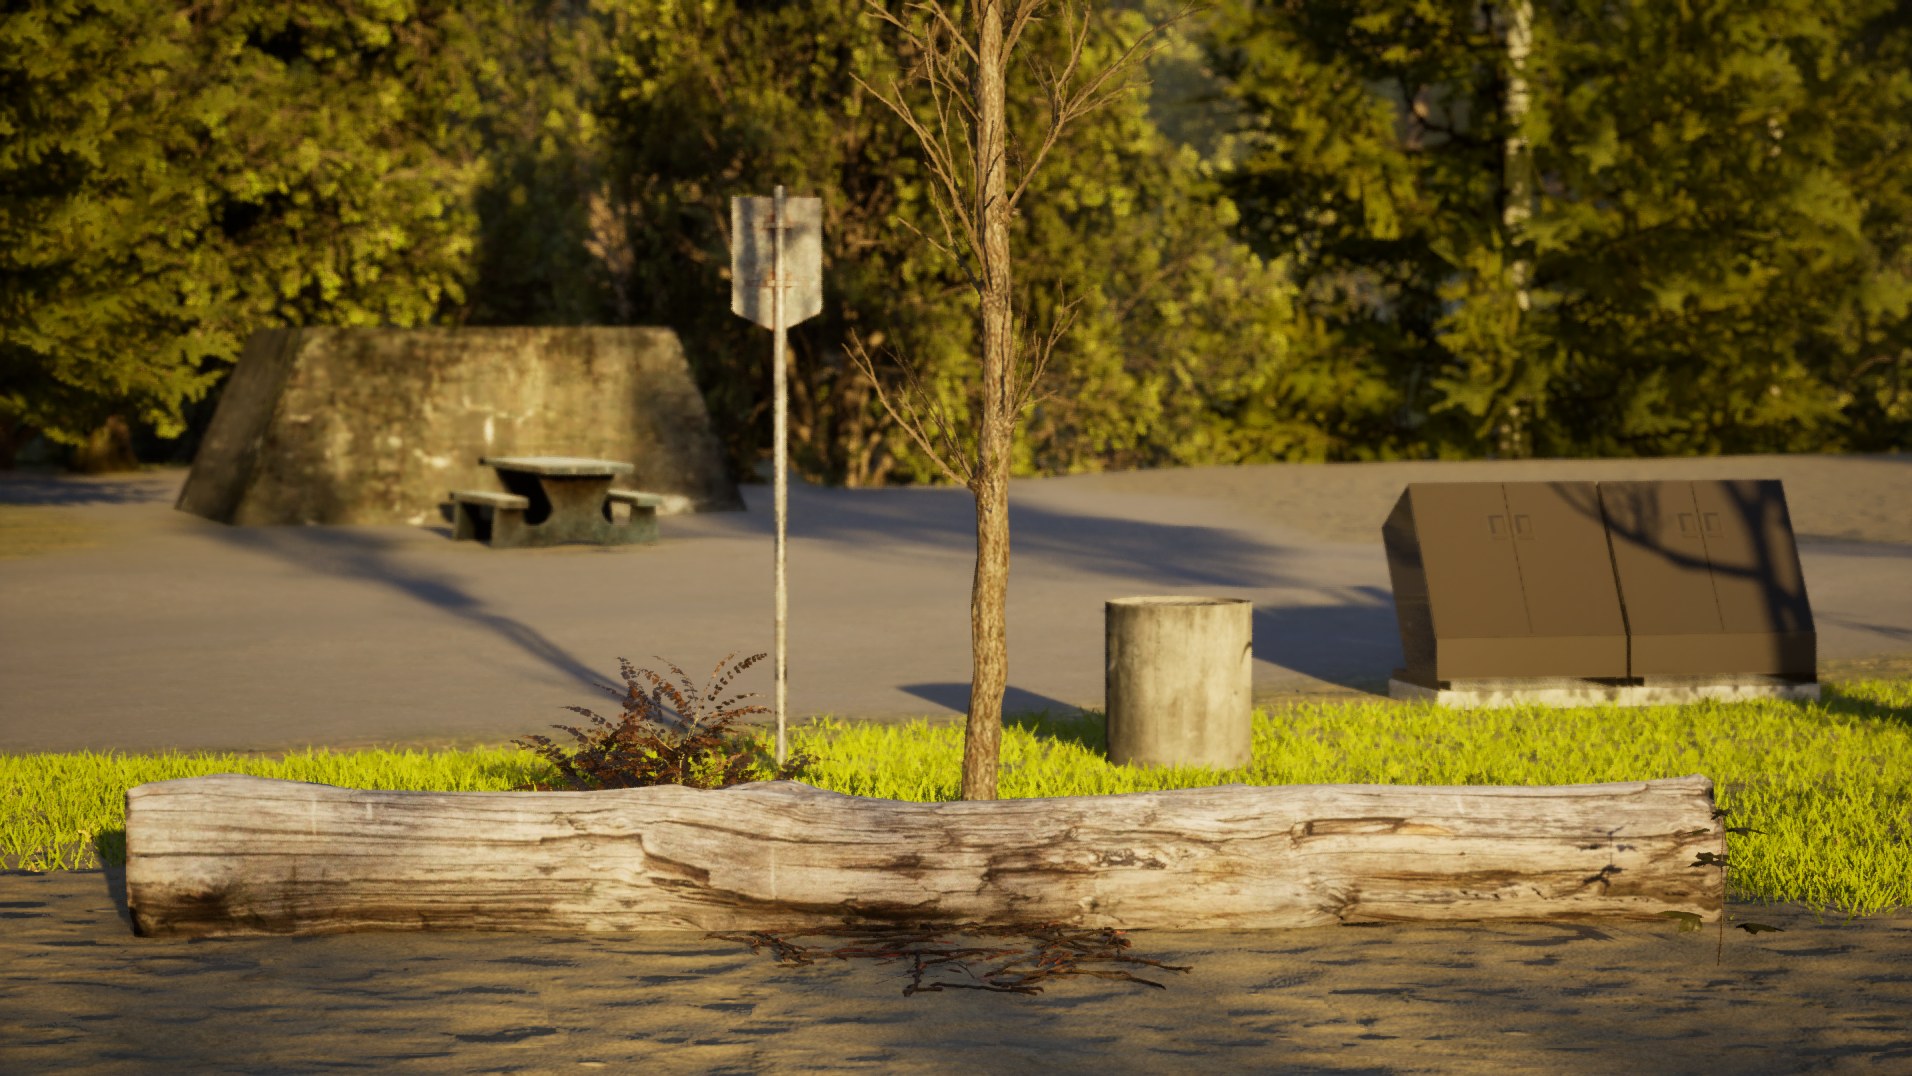
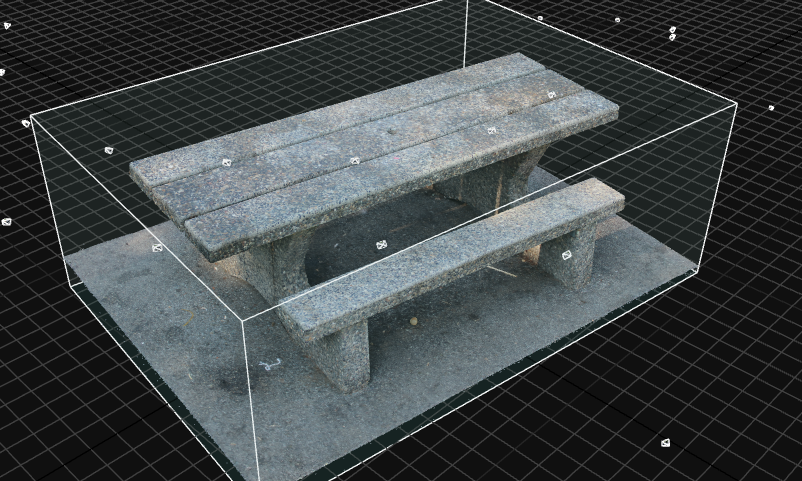
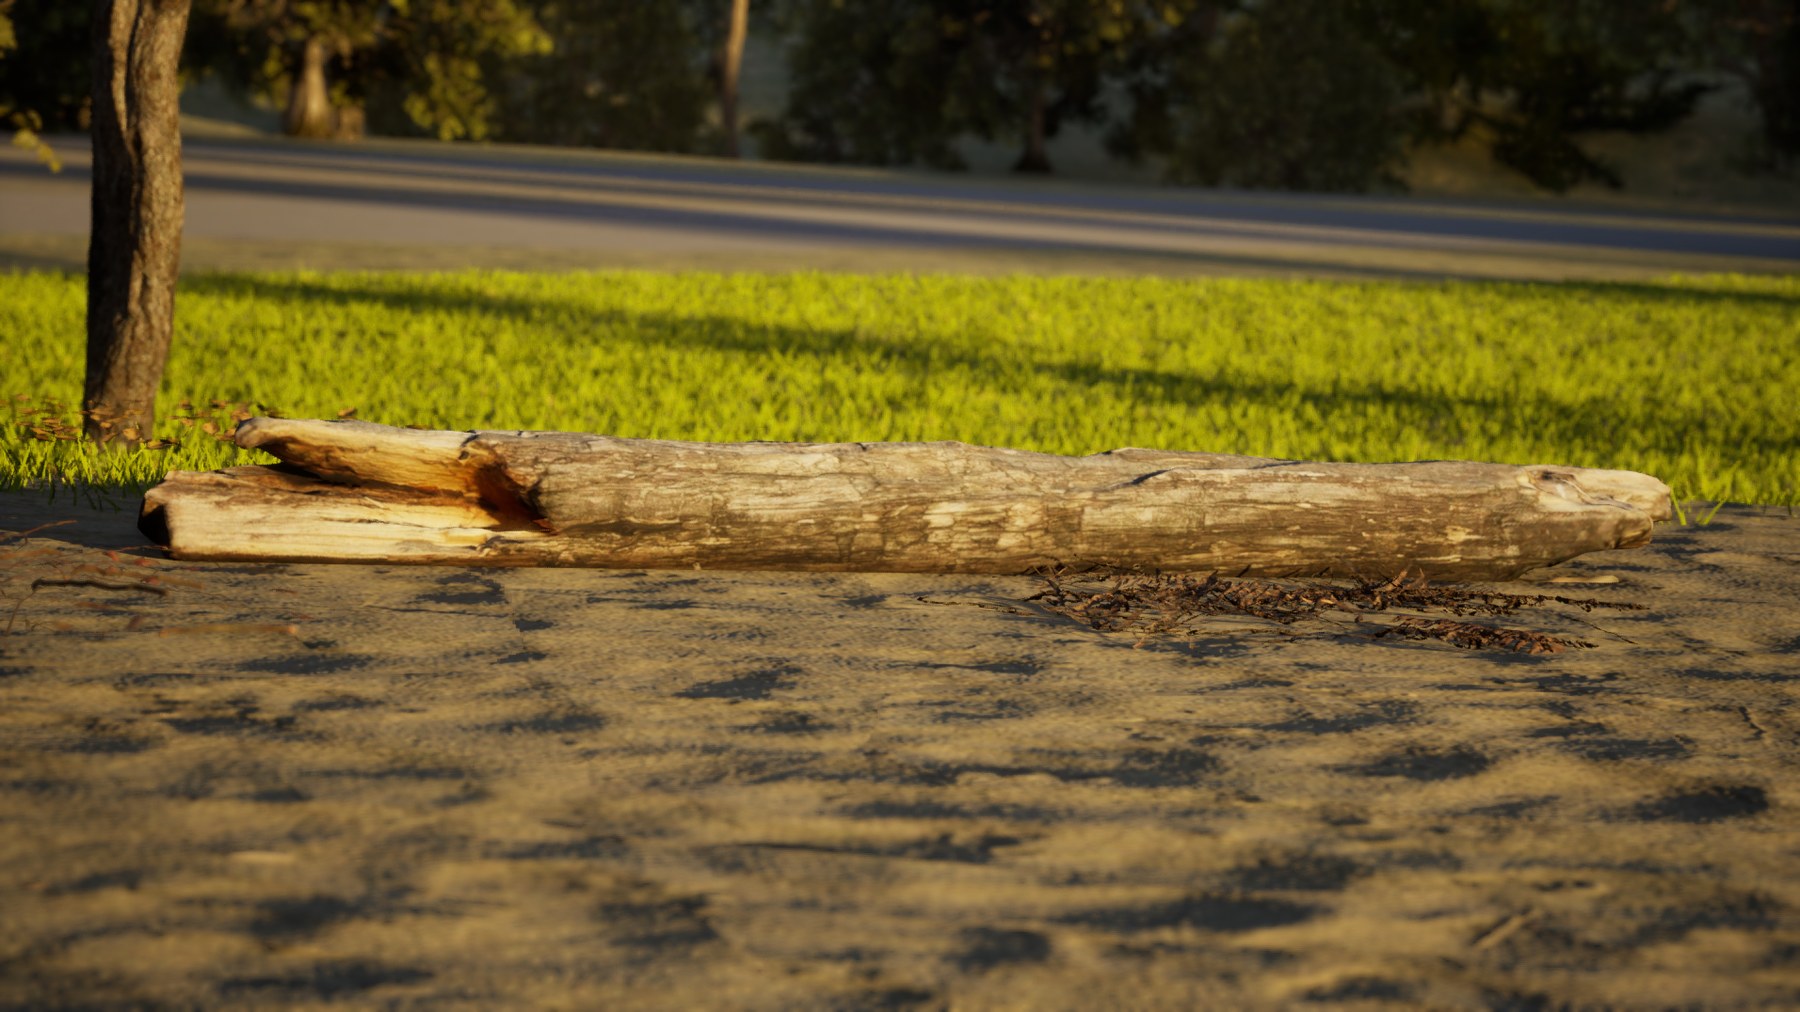
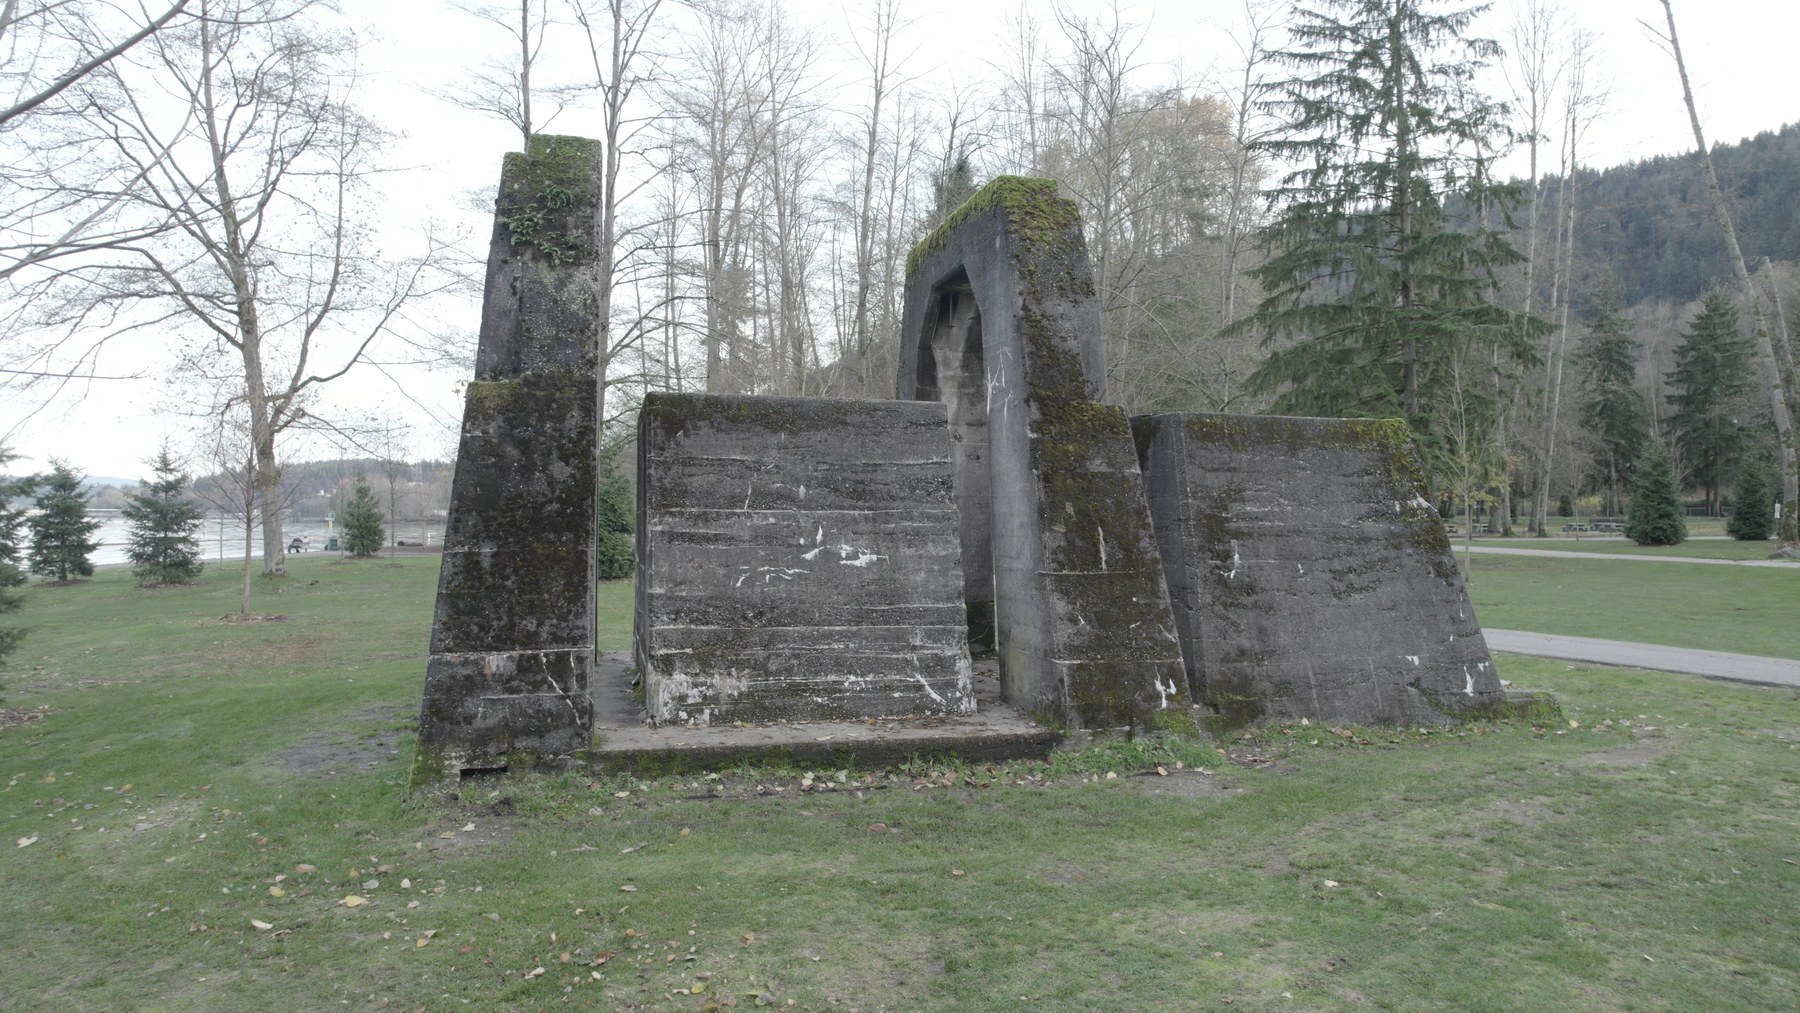
Objects & environments flavour has covered outdoor props (picnic tables, tree trunks, weathered stone), monuments, and location-specific assets when a production needs a particular real-world environment recreated digitally.
Heads & characters flavour has covered human head scans converted into fully-rigged MetaHumans, used in character work across multiple studios where a project needs the likeness of a specific real person.
Recent capture details: drone vs phone-with-selfie-stick photo counts (outdoor park scan, Versatile Media)
Recent capture-time photo counts and methods across an outdoor park scan I did for an upcoming production at Versatile Media:
- Concrete monument (drone capture): 234 photos. The drone was the right call because the monument is taller than a handheld phone could cover from below — elevated angles matter for the top surfaces.
- Picnic table (phone): 98 photos.
- Garbage bin (phone): 115 photos.
- Five separate tree trunks (phone with a selfie stick for stability): 115 to 156 photos each (TreeTrunk01 through TreeTrunk05, 136 / 115 / 148 / 142 / 156 respectively).
Phone-with-selfie-stick (plus a Bluetooth shutter remote to trigger the camera without taking my hand off the stick) handles walkable subjects (trees, tables, bins) cheaply and quickly. The stick gives me reach for low and high angles around the subject, and the remote means I can fire the shutter at any pose without fumbling for the phone — cleaner angles, faster capture. The drone is the right tool when a subject is tall or hard to reach on foot.
Origins
The foundation of this pipeline started in 2018, when I began working with Quixel Megascans for my personal Unreal Engine projects. Integrating those library assets at production quality required understanding the underlying asset pipeline end-to-end: high-poly to low-poly baking, normal map authoring, material setup, texture optimisation. I taught myself the chain from that direction.
Once I had the baking and texturing side down, the natural next step was to start generating my own scans from scratch, which is where Reality Capture entered the workflow.
How it evolved
The pipeline has run across four studios since 2019, each refining a piece of it:
- XRTales (2019–2020, Motion Capture Technician & Developer / 3D Animator): first paid production use, scanning for virtual-production and digital character work.
- Lifelike & Believable Animation Design (2020–2021, Technical Artist): refined the baking and texture-cleanup workflow for animation work.
- Reblika (2021–2022, Technical Artist): scanned subjects for character customisation systems in Unreal Engine.
- Versatile Media (2022–present, Tech Artist → Performance Capture TD → Realtime Supervisor): integrated the pipeline into the studio’s broader real-time production workflow whenever a project needs a site-specific scanned asset.
In production
Still in active use. I run the pipeline whenever a project needs a real-world object, environment, or human likeness captured at production fidelity. Both flavours of the chain have held as the most reliable way to take a real subject from raw photos to a production-ready Unreal Engine asset across seven years of use.